If you’re running a virtual machine in VirtualBox, you may want to install the VirtualBox Guest Additions. These additions provide additional functionality to the virtual machine, such as improved graphics and mouse integration. In this article, I’ll walk you through the installation process in VirtualBox.
What are VirtualBox Guest Additions?
VirtualBox Guest Additions are drivers and system applications installed in the guest operating system. Furthermore, they improve the performance of the guest operating system and offer additional functionality. For example, they enable seamless mouse integration, facilitate shared folders, and enhance video support. In addition to that, they are available for Windows, Linux, and other supported guest operating systems.
Where to download the ISO?
Make sure that you are downloading the latest version.
- Go to the VirtualBox Downloads page to download the VirtualBox Guest Additions ISO.
- Select your host operating system and VirtualBox version.
- Download the extension pack to the “VirtualBox X.X.X. Oracle V.M. VirtualBox Extension Pack” section.
- Open VirtualBox and go to “File” > “Preferences” > “Extensions.”
- Click the “Add” button and select the extension pack you downloaded.
- Follow the on-screen instructions to complete the installation process.
Install Guest additions on Linux/Debian – (Windows Host)
Without further ado, let’s jump into the configuration. For example, I’ll use Debian 11 on Windows 10 Ameliorated. However, the general principles can be applied to other Linux distributions and virtualization software. So, if you’re ready to take your virtual machine game to the next level, let’s get started!
- First, run the Ubuntu/Debian Linux-based virtual machine.
- Next, open the terminal and type:
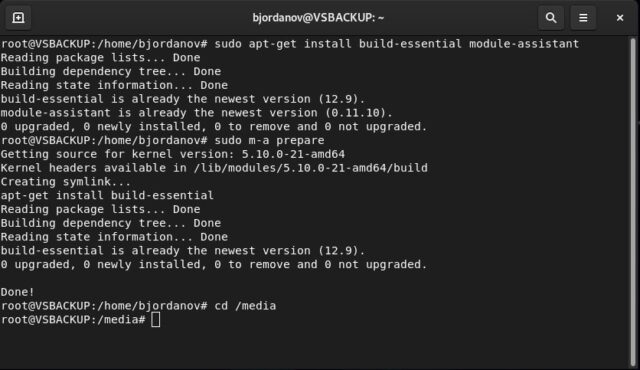
sudo apt-get updateto update the package lists. - Then, install the required packages by typing:
sudo apt-get install build-essential module-assistant. - After that, set up the module assistant by typing:
sudo m-a prepare. - Now, from the VirtualBox menu, select “Devices” > “Insert Guest Additions CD image…” to mount the Guest Additions ISO.
- Change to the mounted directory by typing:
cd /media. - Then, run the installer by typing:
sudo sh ./VBoxLinuxAdditions.run. - Finally, reboot the virtual machine with the command:
sudo reboot.
Installing Guest Additions on Windows (Windows Host)
- Start the virtual machine and log in to the guest operating system.
- From the VirtualBox menu, select “Devices” > “Insert Guest Additions CD image” to mount the Guest Additions ISO.
- Open the Command Prompt as Administrator by pressing the Windows key and typing: “
cmd“. Then, right-click the Command Prompt icon and select “Run as Administrator.” - Go to the CD drive where you have mounted the Guest Additions CD. This can typically be done by typing “
D:” or “E:” followed by “cd“. - Run the Guest Additions installer by typing “
.\VBoxWindowsAdditions.exe” and follow the prompts to complete the installation. - Restart the virtual machine to apply the changes.
Installing Guest Additions on Windows (Linux/Debian Host)
- First, run the Windows-based virtual machine.
- Then, click the “Devices” menu and select “Insert Guest Additions CD image…” to mount the Guest Additions ISO.
- Next, open the terminal and navigate to the mounted ISO by running:
cd /media/cdrom0. - Run the Guest Additions installer by typing:
sudo sh ./VBoxLinuxAdditions.run. - Finally, reboot the virtual machine with the command:
sudo reboot.
The reason I wrote this and the conclusion.
Ladies and gentlemen, I have a confession to make. As a technology enthusiast, I have a bit of a love-hate relationship with virtual machines. On the one hand, they allow me to test and experiment with different operating systems, software configurations, and network setups without risking the stability and security of my primary system. However, on the other hand, setting up and configuring a virtual machine can be a bit of a hassle, especially if you’re new to the game. Moreover, virtualization always has limitations and trade-offs, such as reduced performance or limited hardware support. Therefore I wrote this article for everyone looking for a solution.